
HOW TO GET THE BEST PHOTO OF YOUR ARTWORK
by Dolores Saul PGE

%20Before%20edit.jpg)
%20Grey%20card%20level%20(C)D_Schulz_JPG.jpg)
Level%20White.jpg)
Level%20Grey.jpg)
Level%20Black.jpg)
The first time I wanted to enter a painting into the PGE Get Dusty competition, I was very unhappy with the photo I took. It was too dark and didn’t really reproduce the original colours. I couldn’t possibly enter this!
Many artists have the same problem when photographing their artwork and yet it is fairly easy to resolve. In this article, I am going to present you with a simple ‘recipe’ that doesn’t require expert knowledge or expensive equipment. After all, we need our money for new pastels and the best paper, right?
Ingredients:
- A set of Grey Cards (3 cards in white, grey and black). Try Amazon; there are different brands on the market. They all cost around 8 to 10€ for a medium-sized set.
- A compact camera, a SLR or a good smartphone. For each of these cameras, you should set the image size to at least 4x3 (4000x3000) or better. That's about 3-8 MB.
- Software: Photoshop should be installed on your computer. Years ago I bought an older version of Photoshop Elements on Ebay for around 40€. You’ll probably get it much cheaper today.
The finished painting should still be taped to the board, so the sides won’t curl. You can crop it to size afterwards.
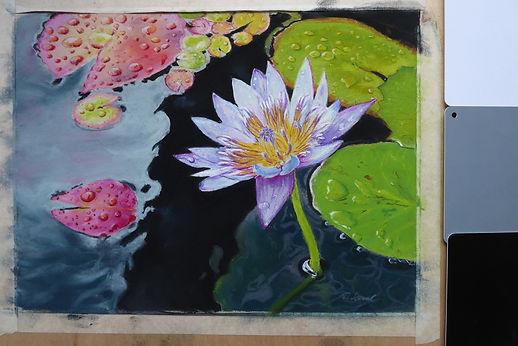
Place your painting on the floor in a bright spot with no shade; maybe in front of the patio door, but not in direct sunlight. The three Grey Cards are placed side by side next to the painting. Use an intelligent auto mode and take your photo from above; the three cards have to be visible (see picture 1).
1. Before editing
Two or three photos will normally be sufficient.
Upload your photos to your computer and save. Choose your best shot.
How to continue with Photoshop:
Open the program, select File (photo), open and copy first! Then close the original photo. You’ll work only with the copy and always have the original photo as a backup.
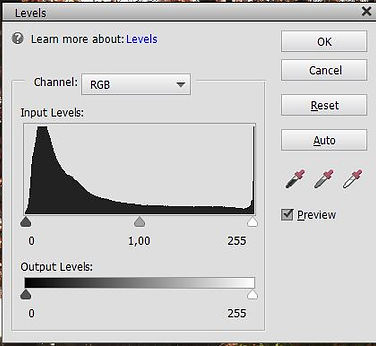
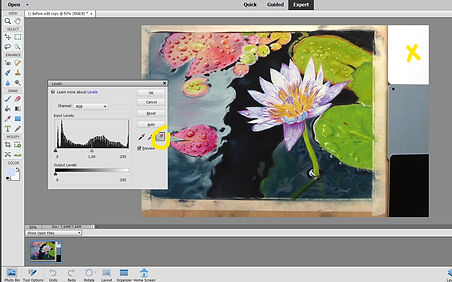
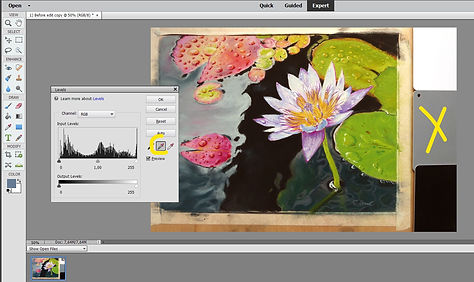
In the menu, choose Enhance > Adjust Lighting > Levels (2.).
Click on each card in your photo with the matching eyedropper tool and click OK. See the changes in pictures 3.,4. and 5.
If necessary, realign your photo with the straighten tool. The different versions of Photoshop offer different ways of doing that. When in doubt, check your manual.
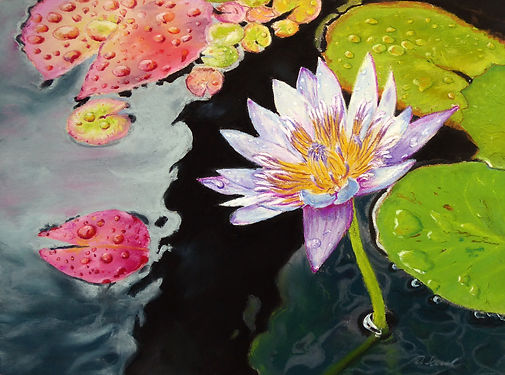
To crop your photo: choose Image > Crop. Click on the upper left corner in the photo, hold it and drag over the part of the image you want to keep. Save your photo as a jpeg file in your selected folder. See the finished photo of the waterlily. I
Finished photo from "Ed´s waterlily" by Dolores Saul PGE